Saturday 15 June 2013

2 Minute Berry Sorbet / Ice-cream.

 
  For those of you who don't like raw eggs, you probably want to skip this post.  As for me, I'm quite happy to polish off moussey, meringuey, delicious-uncooked-eggy-things, so if you find yourself in that "Oh no, don't want to offend the host" situation, you know who to swap bowls with.  That said, I'm sure if you played around you could find a substitute for the egg and this recipe would still work.

  This one is thanks to my wonderful husband.  He will quite often announce that he feels like some dessert at around 9pm when there is no time for planning, preparing or buying ingredients.  So we'll trawl the internet using words like "quick and easy" combined with the 2 or 3 ingredients we have available.  Sometimes it all ends in disaster, complete with ruined food, a cranky, unsuccessful wife and a cranky, hungry husband.  Other times, we find recipes we end up using over and over - like this one!

 In this demo I'm using raspberries, but we also enjoy using strawberries.  I find the strawberry version sweeter and creamier, while the raspberry is more like sorbet.  Hence, I couldn't decide whether to call it ice-cream or sorbet.

Ingredients  (serves 2, but you could probably stretch it further if you aren't greedy)
300g frozen berries
1-2 Tbs icing sugar (I used normal sugar this time and it worked fine)
1 egg

  For anyone interested, my calorie counter puts this at 148 cal per serve.

  Now, I know I said "2 minute" in the title, but if your berries aren't already frozen, it won't be.  If using fresh strawberries, chop the tops off first.  Chuck your berries on a tray or in a bag and freeze them for at least half an hour.

  On with the show. Please note that if you're using strawberries, it will probably yield a slightly different and paler result than what's shown in these photos.  Don't worry - it's hard to stuff this up!

1. Put the frozen berries and 1-2 Tbs of icing sugar (or normal sugar) in your food processor and blitz for 10 seconds or so until they're chopped up.  If it seems like I added too much sugar... I did. Whoops.


2. Add the egg. Blitz until it reaches the consistency you like. It won't need long - we're not aiming for soup.  You should see it become lighter in colour.  Depending on the size of your egg and how frozen your berries are, you might find you're lacking moisture.  If so, you can add a little milk or another egg.


As you can see in this picture, compared with that at the top of the page, mine had already started to melt while I fumbled around with the camera, so make sure it's served immediately.  My husband and I usually finish it off between the two of us, straight out of the mixing bowl, so I'm yet to try freezing and saving for later.
 
Also, I'm sure there are many things one could add or replace, like cream etc. I haven't bothered experimenting because I know I like this as is, I always have the stuff, and I would hate to waste those beautiful berries if I got it wrong!
 
Don't forget toothpicks for those seeds you'll be picking out of your teeth for the rest of the night. Happy eating! 
 

Wednesday 29 May 2013

Wall Cleaning. Get Excited.

Sooo, I ended my last post (you might not recall it, it was so long ago..) with an ambitious "Now it's time to improve!".  HAH.  Obviously what I meant was.. "Now it's time to lie on the couch for a couple months."  I'm sorry if you misunderstood - we are still getting to know each other, after all.

But now I have a REAL excuse.  The excuse that trumps all excuses.  The ultimate get-out-of-jail-free card.  Laundry piling up?  Personal hygiene a distant memory?  Becoming a fast food connoisseur?
Perfectly fine - if you're pregnant.

Yes, whilst my house lies in ruins, my teeth edge closer to falling out, and my poor neglected blog has tumbleweeds for company... I'm building a little person.  So it's alllllll ok.

Still I don't want to be completely boring, so it's time for a proper "life lesson" post.  And what could be more fascinating than... *trumpets sound*...

Wall cleaning!

Well, in truth.. probably just about anything could be more fascinating.  But one day when you're moving out of your rental, or house-sitting for your parents, and your kids decide to 'find the Picasso within' all over the walls, you might suddenly be interested.

To me, cleaning walls is something I imagine only clean freaks bother to do - and I use that term affectionately, enviously even.  The fact is, there are barely enough hours in the week to complete the (is necessary the right word?) 'usual' cleaning tasks - like laundry, dishes, vacuuming etc.  I don't imagine walls are a high priority for people, so it amuses me that I might be mistaken for a clean person by writing this post, when in reality I'm the sort of person who fears some day seeing herself on a show like 'Hoarders'.

It just so happened that my parents were coming to visit and we're looking after their house.  So after a few months of cringing every time I spotted the hallway art, I finally decided to attack it.  Of course, with any stain, the best thing you can do is have at it immediately.  Unfortunately, procrastination followed by self-deprecation is more my style.

The idea for this post didn't hit until I'd already started cleaning, so I didn't capture the scale of the art. There are a few different sorts of stains I'm attacking in these photos.  Obviously, if you love your walls, do a spot test first so you can be sure it won't ruin anything!  I have read other fixes than these of course, but this is what I had on hand and found to be quick, cheap and effective.


Stain: Crayon, sticky tape residue.
Weapon: WD-40.
Application: Spray on. Wipe off.  The crayon was easy, but the tape marks were up high and a bit stubborn so hubby helped out.  He observed that it was easier when he sprayed the WD-40 on the cloth instead of the wall.


Stain: Pencil, pen, black scuff marks.
Weapon: Toothpaste (the cheap white kind - I've heard gel doesn't work the same?)
Application:  Spread toothpaste on stain and let sit.  Scrub off with wet cloth or toothbrush.  I have a spray bottle with vinegar, so I sprayed that on before brushing off (no idea if that makes a difference, I just like vinegar!).  Pencil and biro were easily removed, the black scuff marks took a bit more persuading.  I also use this method on our laminate dining table and vinyl floor.
 Handy tip: Afterwards, place toothbrush somewhere your child won't mistake it for theirs.


  I left some dirt as a point of reference so you could tell I didn't just photograph someone elses nice, clean wall for the "after" shots.  In the last photo the brown spots were removed with vinegar and a microfiber cloth. 

  While I'm talking about vinegar, and since I probably won't have another "cleany" post for a while.. I also use bi carb soda and vinegar in my clothes wash and for cleaning my oven.  My Nan swears by it and Nan's are always right! 

  I don't even own oven cleaner.  I have been known to overfill cake pans and end up with spillage which I can overlook for months while it bakes and burns on the bottom of the oven.  All I do is a quick sprinkle of bicarb over the mess, followed by a spritz of vinegar.  I let it sit (minutes, hours, days.. depending on the stain and my patience) and then off it comes with a scrub.  That goes for pans and cooktops too.  The best part is that it's perfectly safe and you can still use the oven!  No waiting or airing.

  Ok.  Enough productivity for now.  Time for a cuppa!


Wednesday 20 March 2013

Klippekrans

  I would've liked my first baking post to start with faultless technique and end with perfection on a plate, but that just wouldn't be me.  I have a natural affinity for baking.. just not the natural talents to back it up.  No, what I have is a natural clumsiness.  Just ask my husband - something always gets forgotten or spilled.

  However, I push on and hope that at least 50% of what I make will be passable enough to serve.  So now that you've been warned, let's have a look at my weekend baking effort
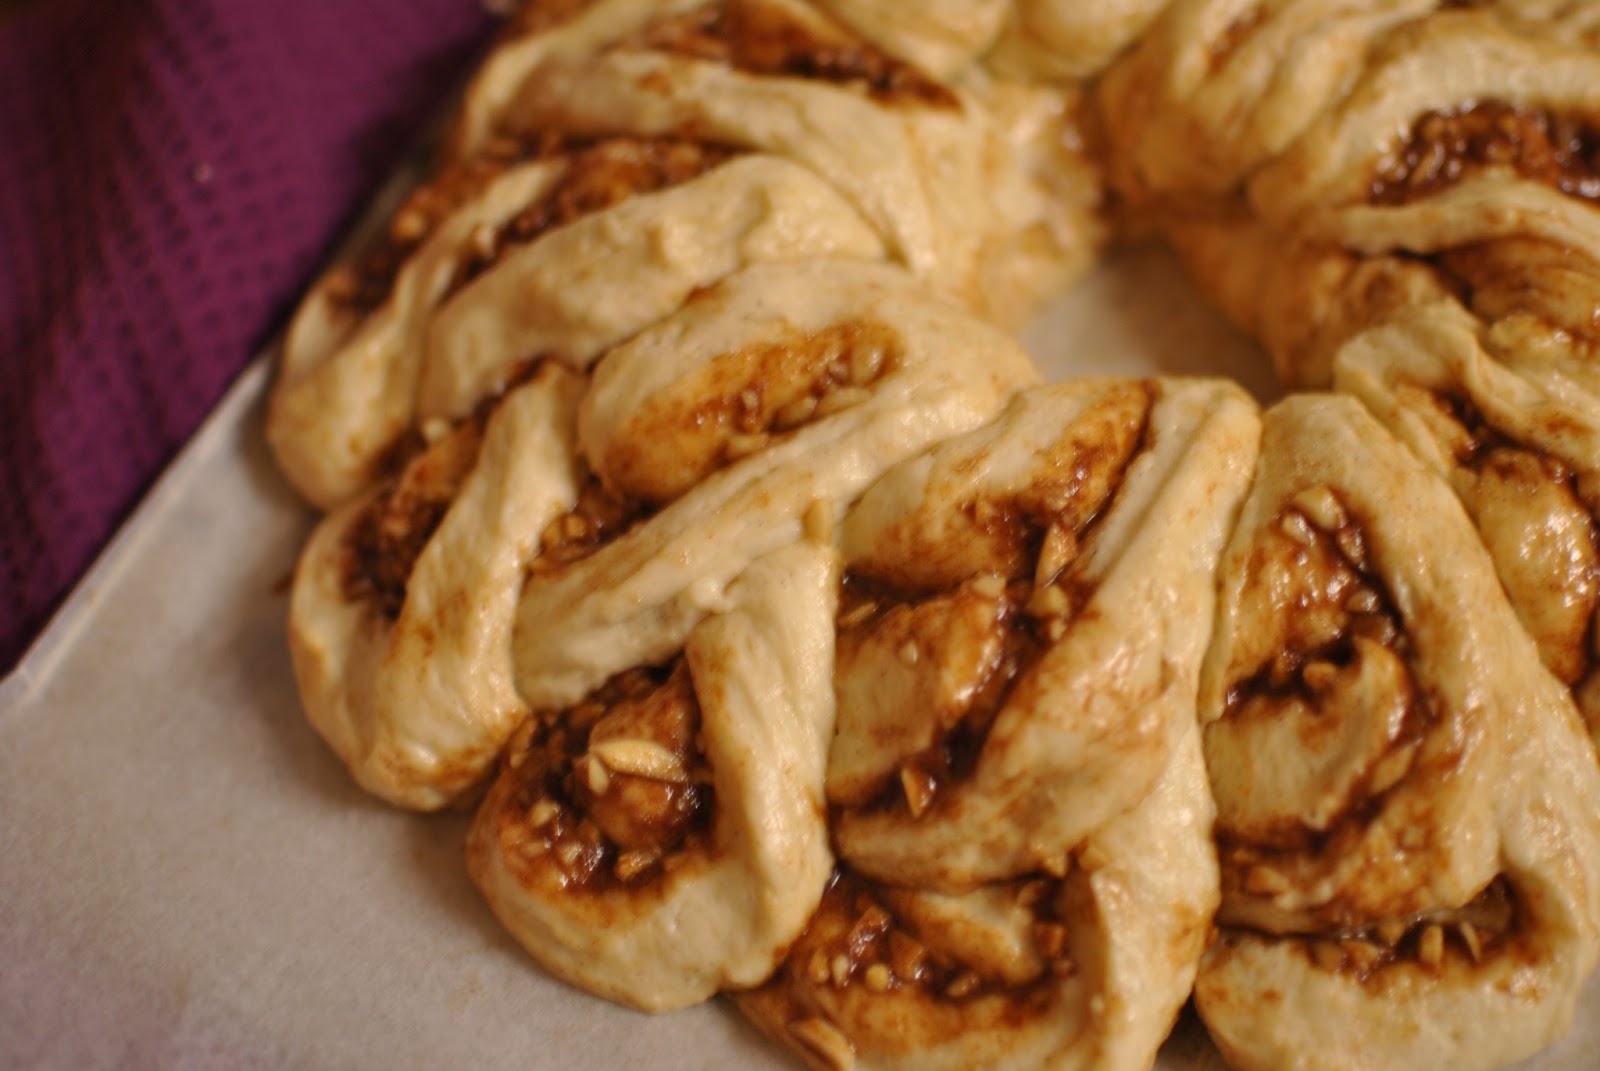
 - Klippekrans.


  First things first - ingredients.  For me, there's one ingredient that makes things smell & taste like Norway...


Cardamom.

  Norway in a bottle.  I love the smell, and the taste, and the fact that it's used in just about all of the Norwegian bun recipes I've tried.  Many of these recipes spring from one base dough with small variations. Today I'm bringing you Klippekrans, which translates to "cut wreath", assumedly because the presentation involves cutting and overlapping the dough to form a pretty wreath.

  But I guess you need ALL the ingredients, hey.

Dough
100 g Butter
350 ml Milk
100 g Sugar
2 packets Dry Yeast (or 50 g Fresh)
1 ts cardamom (I like to heap mine)
600 g flour approx.
1 egg (for brushing over)

  To be honest, I didn't really measure my filling.. I just sort of threw in what seemed right.  Feel free to adjust it to your tastes.  Here's my best guess of what I did... maybe my 1/3 cup was the only clean one or something, cos there's a lot of "80 g" going on here...*shrug*

Filling
80 g (1/3 cup) Margarine or Butter (I used margarine because it's easier to spread).
80 g (1/3 cup) Sugar (I used both white and brown).
80 g Chopped Almonds
1 Tbs Cinnamon

Topping
80 g (1/2 cup) Icing Sugar approx.
Milk, a teaspoon at a time until it reaches the right consistency.
Perlesukker (Don't think Oz grocery stores have this - I bought it from a Swedish shop on the Gold Coast).

  Now before you read further, you should know something. I have a huge problem with indecision.  The internet is full of conflicting opinions when it comes to cooking, so I'm never sure on how much, which order, how long, what temperature etc. so if it seems like my methods are strange... well don't ask me, cos I'm just as confused as you.  I couldn't even decide which sugar to use!

  When making dough some people like to slowly add the dry to the wet, others prefer to add the butter last, bit by bit; some say beaten eggs are better than unbeaten eggs.  I'm not the kind of person who can taste these subtle differences, so I tend to do whatever I'm feeling on the day.  It's just how I roll... or make rolls. Heh.

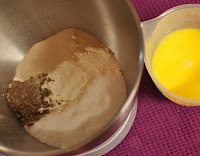
1. Keeping 1 cup of flour aside, chuck the dry dough ingredients in a bowl and combine. Just for you, I arranged mine all pretty-like.


2. In a jug, melt the butter and add milk, warming to lukewarm.

3. With dough hook attached, set the mixer on low and add the liquid to the dry ingredients.

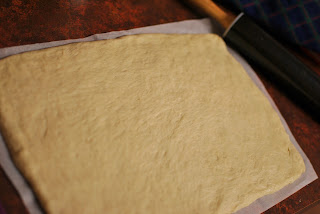
4. Little by little add the rest of the flour while it kneads.  When it stops sticking to the bowl, stop adding flour. After at least 10-15 mins of kneading, it should be smooth and elastic.

5. Sprinkle a little flour on top, cover and leave to rise for 30 mins.

  Remember that indecision quirk of mine?  Well I couldn't decide on covering the bowl with glad wrap, a tea towel, or a plate... so I did all three!


6. Combine all the filling ingredients, except for the nuts, in a bowl (if using butter, you might like to heat it to make it spreadable).

  I decided to fiddle with my blog to pass the time while the dough was rising.  An hour later I realised I'd gotten a little carried away.
Oops.  Good to see it rose though!

7. Preheat oven on 200'c or 180'c fan forced.  Plonk the dough on a sheet of baking paper, and roll it out to around the size of a baking tray.  


8. Spread the filling mix all over, and sprinkle the chopped almonds on top.

9. Roll into a sausage, as you would for cinnamon rolls.  Transfer to a lined baking tray, and shape into a circle. To attach the ends, open one up a little and fold it around the other end.

   From this point my pictures are more of an indication of how it shouldn't look.  But if yours does look like mine, never fear, it all turns out in the end!
  Perhaps I had too much yeast, or left it sit too long again, but by now mine was so puffy that what should have been an arm-sized sausage, was looking more like a thigh.
I struggled to manouvre the ever-growing python into a circle.  This didn't happen last time! ...Ah well.

  Mmm. Appetizing. 

  I started rethinking this post right about now. 
10. I couldn't take photos while doing this step, so I hope I can explain it well.  Using kitchen scissors (you could use a knife) and without going all the way through to the tray, cut into the sausage twice, making a finger-width 'slice'. Pull gently towards the inside of the circle.  A finger-width behind that, make a cut to form another slice.  Pull this one towards the outside of the circle.  It should make a little 'V' shape of spirally, gooey bits.  Continue around the wreath in this manner, moving pieces left and right until the last 'V' rests on the first one. 

11. Let it rise for another 20-30 mins.  I skipped this step, because mine was so ridiculously puffy, the tray was struggling to contain it.

12. Brush over with egg, and bake for 20-30 mins.  I let mine go an extra 5 minutes, as I didn't feel it was brown enough.

Done.

13.  Now for the most frustrating part of cooking - "allow to cool".  Pffft.  I have no patience whatsoever, and consequently end up burning my mouth almost always.  

14.  When cooled, mix together the icing sugar and milk with a spoon until you like how it falls off the spoon, and go to town.

I drew big 'V' shapes back and forth over mine, followed by little 'v's inside them.  Sprinkle with perlesukker and bob's your uncle... it's tucker time. 


It didn't all go to plan, but I took it to morning tea with some friends and didn't bring any home.  Success!


Monday 11 March 2013

Welcome!

Allow me to introduce myself. I'm Sam. I'm married, have some kids and I love Jesus. Other loves in my life include...


Baking.

Yep.  I'm one of those people who post food pics.  Not just any old "check it out, I'm having eggs for breakfast" pics though, just the stuff I've put hours into and am particularly proud of. Usually it's cakes.


Norway.

I married a Norwegian and instantly became aware of my total ignorance of other cultures.  So I am enjoying getting to know Norway, especially the food and language.


Music.

 If I had all the time in the world, I would put music to all of my Dad's beautiful poetry.


Craft.

Be it with kids or creating something pretty myself, I do like making stuff.  Unfortunately I have a super low rate of completion.


Boy Stuff.

On the shelf above my computer live my lego toys, star wars toys, transformers toys, lego star wars toys, star wars transformers toys.. you get it. Love them. 


I also enjoy most sports, but sadly have no athletic ability myself.

In my spare time I sometimes play games (computer/console/card games.. whatever), but sadly have no ability for those either.

Though these are things I enjoy, there is no guarantee I'll blog about them.  It will probably just be mostly me sooking about stuff.

Cheers!